
What is Flashing in Masonry?
- John Screen
- Jan 7, 2025
- 2 min read
Updated: May 19
When it comes to masonry, many homeowners and contractors focus on the visible elements like bricks, mortar, and stone. However, some of the most important components in a masonry project are hidden from view. Flashing is one of these often-overlooked yet crucial elements that ensures the longevity and integrity of masonry structures.
Understanding Flashing

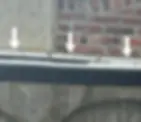
Flashing in masonry refers to thin, waterproof materials installed to direct water away from critical areas of a structure. It’s used to prevent water penetration, which can lead to structural damage, mold, and other costly issues. Flashing is typically placed at vulnerable points in a masonry wall, such as:
Above doors and windows: To direct water away from these openings.
At the base of walls: To manage water that may seep down.
Around chimneys and roof intersections: To prevent water from entering the building envelope.
By guiding water to the exterior, flashing protects the building from moisture-related damage. For more insights into masonry restoration, check out our brick and stone repair services.
Types of Flashing Materials
Flashing can be made from a variety of materials, each suited to specific applications:
Metal Flashing: Made of stainless steel, copper, or aluminum, these materials are durable and often used in high-stress areas.
Plastic Flashing: Lightweight and corrosion-resistant, but less durable in extreme weather conditions.
Rubberized Asphalt Flashing: Offers flexibility and waterproofing, commonly used in modern construction.
To learn about how we incorporate durable materials in our projects, visit our historic masonry restoration page.
Why is Flashing Important?
Water is one of the biggest enemies of masonry structures. Without proper flashing, water can infiltrate the walls, leading to:
Freeze-Thaw Damage
When water enters masonry and freezes, it expands, causing cracks.
Efflorescence
White salt deposits that form on the surface of bricks or stone due to water evaporation.
Mold and Mildew
Persistent moisture creates an ideal environment for mold growth.
Proper flashing is not just a protective measure; it’s an investment in the longevity of your masonry structure. You can explore our detailed guide on preventing water damage in masonry for more tips.
How Flashing is Installed
Flashing installation requires skill and precision. The steps generally involve:
Preparing the surface: Ensuring a clean, flat area for flashing to adhere.
Cutting the material: Flashing is cut to fit the specific area.
Sealing edges: Sealants are applied to prevent water intrusion.
Installing weep holes: Small openings allow water to escape from behind the flashing.
Additional Resources
For a broader understanding of flashing in construction, you can refer to educational resources like The Masonry Society or Building Science Corporation.
JMS Masonry & Restoration is Here to Help

Flashing is an essential part of any masonry project, but it’s just one piece of the puzzle. At JMS Masonry, we specialize in comprehensive masonry solutions, from tuckpointing to historic restorations. If you’re planning a project or need repairs, contact us today to ensure your masonry stands the test of time.
Protect your investment with the right materials and expertise—because great masonry starts with attention to detail.